


In making a Squarespace site, you may run into a situation where you want to have a little bit more customization than what Squarespace offers in terms of design. In this case, you can insert custom CSS into your website in order to make changes. However, the information entered in the Custom CSS box loads on every page of your website. In most cases, this is perfect, as you may want to add a filter to all of your images or add more padding on your menu. However, this can backfire when you only want to change elements on one page. For example, you may want to only change the menu on the home page in order to accommodate your video background, change the styling of the price of your product that is on a huge sale, or add a background image to your newsletter block on a blog page.
Depending on the type of page, implementing the CSS is a slightly different process. Regardless, you have to manipulate the code in the same way. When you insert code into the standard Custom CSS box, it is normally formatted like this:
#header {
opacity: 0.1;
}
To be able to put it on one page, wrap the code in <style></style> tags. An example of doing this to the previous code is below:
<style>
#header {
opacity: 0.1;
}
</style>
Changing CSS on Primary Pages
On all types of pages, when you hover over the page, there is a Settings icon. Click on it, and and then head to the Advanced tab. Once there, paste the code that you created earlier into the Page Header Code Injection box like shown below:
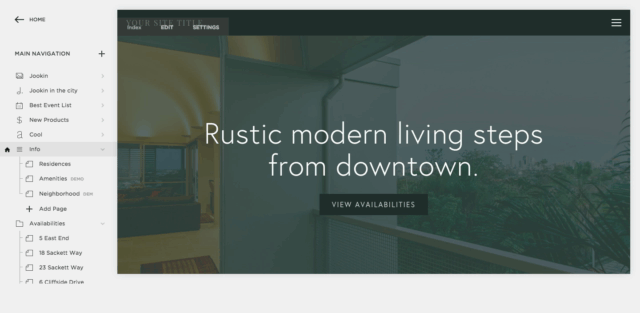
This should be perfect in most cases. However, you may want to be even more specific. If you on apply this on Blog, Event, or Product pages, it will apply to all of the content within that page. You may not want every blog to have the same background image for the Newsletter block or all of your prices to have the special Sale color.
Changing CSS on Individual Blogs and Events
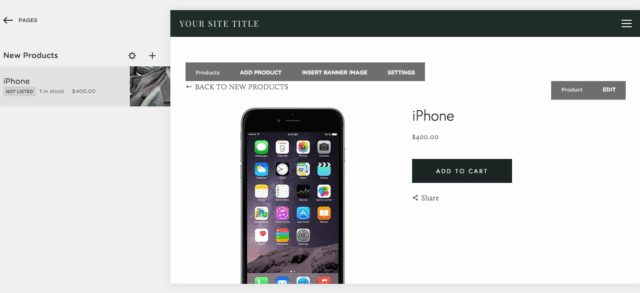
Both Blogs and Events operate in the same way and follow the same Draft/Publish system. In order to add custom code, go into the edit mode of the specific blog or event, and create a Markdown block. In the Markdown block, enter the code you create surrounded by the <style></style> tags. The cool thing about the Markdown block is that you can continue to type as normal, allowing you to disguise that there is a block there at all since there will be no extra spacing. An example of adding Custom CSS to one of my favorite events is below:
And now, you can add custom code on any page at will. Use your new powers responsibly!
Leave a Reply